Introduction
Posterior shoulder instability has historically accounted for 2-5% of instability cases.1 However, recent reports estimate posterior instability accounts for approximately 24% of all operative glenohumeral instability cases.2 Those with posterior instability are typically athletes who participate in overhead throwing sports and weightlifting. Overhead throwing, specifically during the late cocking phase and follow through, places significant demands on the glenohumeral joint leading to a significant risk for developing posterior shoulder instability.3 The military population is also subject to posterior shoulder instability due to repetitive microtrauma such as pushups, martial arts, and weightlifting.3
The presentation of posterior instability can be variable, with pain being the common complaint rather than instability.4 This can complicate prompt and accurate treatment and lead to declining athletic performance.5,6 Etiologies include acute trauma, repetitive microtrauma, and voluntary dislocation.7 Given recent reports of the high prevalence of posterior shoulder instability, there is a need for increased awareness of effective rehabilitation protocols.
For those who have failed nonoperative treatments and elect to undergo surgical intervention, a comprehensive and focused rehabilitation protocol can optimize patient recovery and facilitate return to full activity. Currently, there is limited literature regarding post-operative rehabilitation after surgical management for posterior instability. Therefore, the purpose of this clinical commentary is to present a post-surgical rehabilitation program for patients following posterior shoulder labral repair, with recommendations based upon best medical evidence.
Anatomy and Biomechanics
The glenohumeral joint relies on an intricate balance of static and dynamic stabilizers. These include the labrum as well as capsuloligamentous and osseous structures, including the glenoid and humeral head. The labrum enhances static stability by increasing glenoid depth and acts as an anti-shear bumper throughout shoulder motion.8 The rotator cuff and scapulothoracic musculature are the primary dynamic stabilizers. It has been shown that the subscapularis muscle is particularly important as a dynamic stabilizer in posterior instability.9 In addition, the scapular position on the chest wall, protraction, and medial border stabilization with high quality rhythm is important to ensure posterior stability of the shoulder joint.10 Any disruption to these structures can compromise stability and lead to glenohumeral subluxation or dislocation. Several anatomic differences exist between the posterior and anterior anatomic structures. The posterior band of the inferior glenohumeral ligament (IGHL) has been shown to be thinner than the anterior band of the IGHL.11 Additionally, a biomechanical study found that the cross sectional area of the posterior shoulder capsule was thinner in patients with posterior and multidirectional instability.12 If this is the case, a lesser force may be necessary to disrupt the posterior capsuloligamentous structures and may explain why repetitive microtrauma represents a common cause of posterior instability.13 Glenoid retroversion may also be a major contributor to posterior instability.14,15 Gottschalk et al reported that glenoid retroversion was significantly increased in patients with posterior instability (-15.4° ± 5.1°) when compared with anterior instability (-12.1° ± 6.9°; p < 0.016).16 Although it is unknown if retroversion precedes instability or if instability leads to retroversion, an association seems to exist.7
Surgical Treatment
Surgical intervention typically is indicated for patients who have failed conservative treatment, or for those with posterior instability from an acute traumatic incident with apparent soft tissue or osseous pathology.17 In the absence of humeral or glenoid bone loss, typically an arthroscopic posterior labral repair +/- capsular repair is performed with suture anchors, which leads to high levels of return to play and patient satisfaction.3,5,18 Concomitant pathologies are common and should be addressed. These include superior labrum anterior to posterior (SLAP) tears, reverse Hill-Sachs lesions, and rotator cuff tears.7 When glenoid bone loss or glenoid dysplasia is present, some have advocated for bone augmentation procedures or glenoid osteotomy.1,13,19–23
Post-operative Rehabilitation
Successful rehabilitation following posterior labral repair relies on close communication between the surgical team and physical therapist regarding post-operative restrictions and protocols. Chronicity of the condition, tissue quality, and the size of the surgical repair may influence outcomes. Rehabilitation typically consists of five phases: (I) protection phase, (II) active range of motion and muscle endurance, (III) initial resistance strengthening, (IV) advanced muscular strengthening and power, and (V) return to sport. The following rehabilitation protocol is a combination of expert opinion and scientific evidence aimed at maximizing functional outcomes after posterior labral repair. It should be noted that the operating surgeon should be involved in the individualization of each patient’s rehabilitation protocol based on intra-operative findings. A criterion-based progression developed by the present manuscript’s authors provides a suggested framework to assist clinicians in guiding their patients through the phases of rehab. It is a combination of subjective and objective findings that will suggest the patient’s functional readiness to progress. The criterion includes assessment of pain levels, Quick DASH scores, active and passive range of motion, scapular mechanics, muscular endurance, strength, and functional testing.
Phase I – Protection Phase
The goals of Phase I are to protect the surgical repair, decrease post-operative pain, minimize edema, maintain mobility of accessory joints, and most importantly, to educate the patient. Initiation of physical therapy may begin as soon as post-operative day 1. The first post-surgical physical therapy visit includes collection of a thorough history, evaluation of the current post-operative status, and establishment of meaningful functional goals with the patient. The physical therapist should then review the surgical findings and procedure, post-operative restrictions, rehabilitation protocol, and prognosis. Together with the patient, the physical therapist will develop a plan of care and supplemental home exercise program that suits patient’s expectations and needs.
Passive range of motion (PROM) of the shoulder joint may be initiated immediately or may be deferred for up to two weeks post-operatively, depending on surgeon preference and specific patient related factors. The main factors that determine the length of the immobilization period are tissue quality and size of the surgical repair. During this time, the patient is immobilized in a sling with an abduction pillow which supports the glenohumeral joint in the scapular plane and minimizes stress on the surgical repair. Cryotherapy also is an important adjunct to decrease pain, muscle spasm, and edema.24 The authors recommended cryotherapy to be utilized five to six times daily for 30 minute intervals during the first two weeks post-operatively. Compression socks and ankle pumps are also recommended to decrease the inherent risk of developing deep vein thrombosis.
Whether PROM of the shoulder joint is indicated or not during the early protection phase, it is imperative to maintain mobility of the joints surrounding the shoulder. To achieve this, the patient is educated regarding active range of motion of the cervical spine, elbow, wrist, and hand. Gentle scapular retraction and depression exercises are utilized to encourage postural muscular activation and prevent anterior shoulder stiffness. All exercises can be performed out of the sling and are recommended to be performed three to four per day.
Initiation of Passive Range of Motion
PROM of the shoulder is initiated once cleared by the operating surgeon. PROM is typically introduced two weeks post-operatively and is utilized to prevent post-operative stiffness. At this time the surgical repair is in the very early stages of tissue healing and protected passive motion is utilized without placing stress on the surgical repair. Depending on the extent of the repair, PROM of the shoulder is typically limited to 120° of forward flexion, 90° of abduction, and internal rotation to the abdomen with the arm resting at the patient’s side. External rotation may be limited to 30° to limit any stresses throughout the shoulder joint, though this is case and surgeon specific. These restrictions are typically in place for an additional four weeks until the patient has reached six weeks post-operative. Additionally, posterior loading of the glenohumeral joint and internal rotation when the arm is away from the body, such as reaching behind the body, should be avoided for at least six weeks to avoid stress through the posterior ligamentous complex where the repair was performed. The physical therapist begins by performing gentle PROM within the outlined restrictions. Progression of PROM is continued until symmetrical motion of both shoulders is achieved or functional norms are demonstrated.
Components of Dynamic Glenohumeral Joint Stability
When implementing initial muscle activation, it is important to understand the factors that influence dynamic shoulder stability. The dynamic stabilizers consist of the rotator cuff and scapulothoracic musculature which work in concert to stabilize the glenohumeral joint during functional motion. The subscapularis works with the infraspinatus and teres minor to create the anterior-posterior force couple, which generates dynamic stability by compressing the humeral head into the glenoid fossa.25 Additionally, the subscapularis, infraspinatus, and teres minor provide an inferomedial force that counteracts the superior directed force of the deltoid during arm elevation.25 These mechanisms emphasize the importance of proper reintroduction of muscle firing patterns to ensure dynamic joint stability with functional movement that may have been compromised prior to surgical intervention.
Isometrics
To promote early protected dynamic joint stability, submaximal isometrics of the rotator cuff and the scapulothoracic musculature are typically introduced two to four weeks following the initiation of PROM. Timing associated with the introduction of these exercises is based on clinical judgment of the treating therapist including but not limited to the patient’s ability to tolerate such exercises due to pain and discomfort. Submaximal isometrics exercises target the subscapularis, infraspinatus, deltoid, and rhomboids. These exercises can be performed in a home program while standing in a doorway using the wall as resistance. The patient is instructed to gently push into the wall in each position, starting at approximately 25% of the maximal force and increasing force production until sufficient firing patterns of the targeted musculature are established. During this time, it is critical for the treating therapist to monitor pain, assess the quality of these firing patterns, and assist with muscle facilitation to ensure proper muscle activation. Pain free performance and scapular control is emphasized throughout the completion of these exercises.
Criteria to Progress
Prior to progressing to the active motion phase, the patient should be able to passively achieve the range of motion noted in the criteria to ensure sufficient glenohumeral joint mobility. Initial scapular control and mobility is also evaluated at this time by determining the patient’s ability to perform an active scapular clock. This includes the movements of scapular retraction, protraction, elevation, and depression. When the patient can perform this with minimal substitution patterns, the patient possesses initial scapulothoracic muscle firing patterns and scapular mobility to progress to the active motion phase. The complete criteria to progress to the next phase of rehabilitation is summarized in Table 1.
Phase II – Active Range of Motion and Muscle Endurance
Once the patient has met the criteria to progress to Phase II and active motion is permitted by the treating surgeon, the patient begins with active assisted range of motion (AAROM) with progression to active range of motion (AROM). This typically occurs at five to six weeks post-operatively. The goal of this phase is to normalize AROM, improve rotator cuff and periscapular muscular endurance, and establish normal scapulohumeral mechanics with basic functional activities. At this time the surgical repair is in the preliminary phases of tissue healing,26 and specific exercises are utilized to minimize stress on the surgical repair by continuing to avoid posterior loading and internal rotation when the arm is away from the body. This phase also continues to progress rotator cuff and scapulothoracic musculature activation to restore dynamic joint stability.
Active Assisted Range of Motion
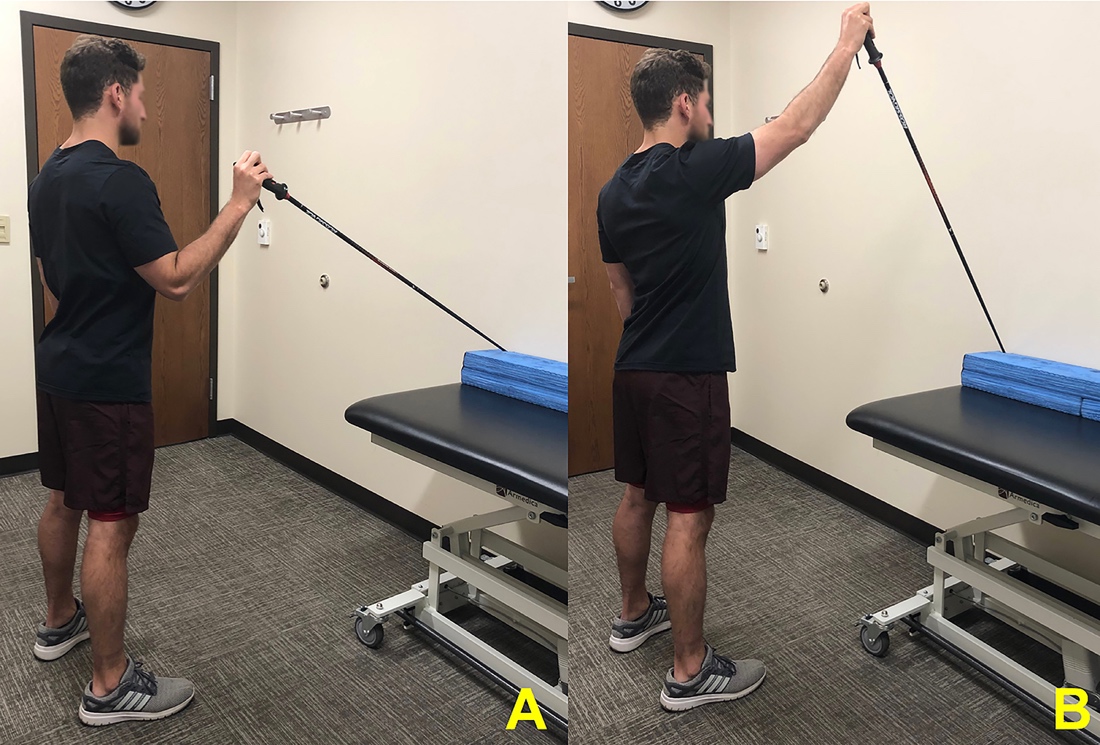
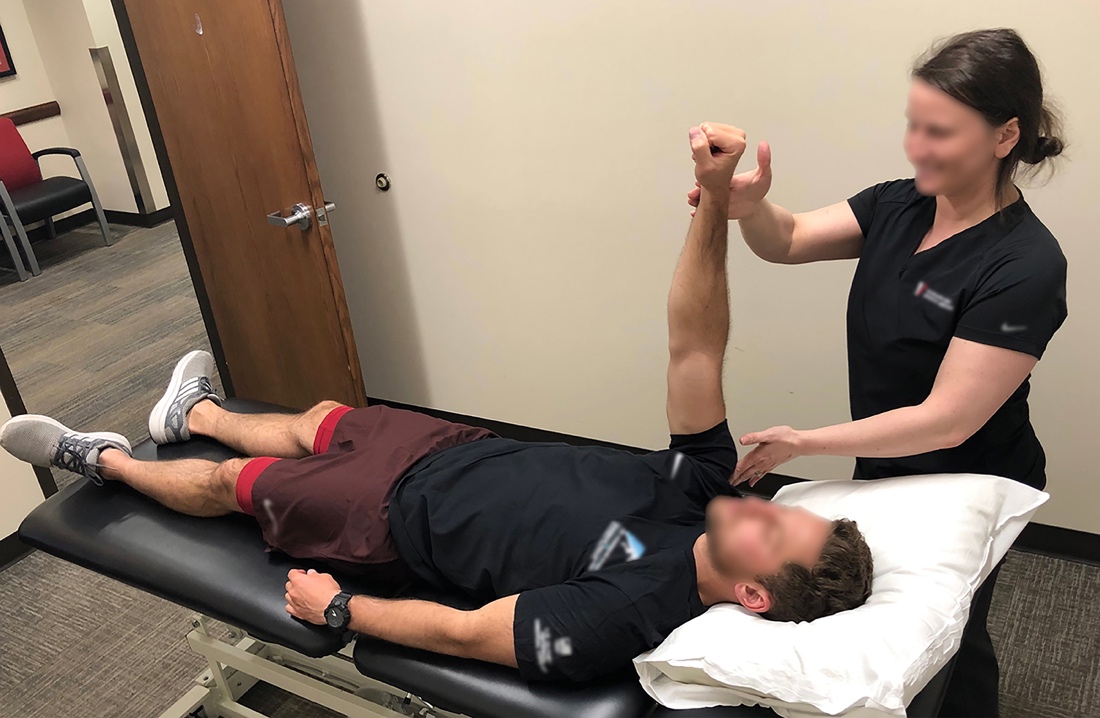
AAROM typically begins one week prior to the initiation AROM to facilitate muscle recruitment and joint motion required for active motion. AAROM exercises are introduced in supine or prone positions to decrease the gravitational stress through the joint, and then progressed to seated and standing as tolerated by the patient. In the supine position, the patient can begin AAROM with the help of the contralateral upper extremity or lightweight wooden dowel moving into forward flexion, external rotation, and internal rotation within surgical restrictions. To assist with more specific functional motion, standing supported forward flexion is a safe option for AAROM, showing submaximal active control of rotator cuff and periscapular muscles to allow for proper retraining of the muscular firing patterns (Figure 1).27 This exercise is easily performed as part of a home exercise program with the use of a ski pole or a lightweight wooden dowel and can be progressed by the addition of moving through multiple planes of assisted motion. When possible, the patient is encouraged to perform exercises in front of a mirror for visual feedback to avoid common compensation patterns such as shrugging or thoracic extension. It is important that the physical therapist utilize verbal and tactile cueing to ensure the patient is demonstrating appropriate scapular control while minimizing substitution patterns.

Active Range of Motion
AROM is initiated when the patient is able to perform isometric and AAROM exercises with appropriate muscle activation and mechanics with minimal pain. Initiation of AROM typically begins at week six post-operatively and is progressed to full pain free motion in all planes. Once AROM is indicated, the patient can discontinue the use of his or her sling and begin light activities of daily living.
AROM begins with exercises that minimize stress on the repair, demonstrate short lever arms, and produce minimal muscle activation of larger accessory muscles. This typically begins in a supine position, progressing to standing exercises as muscular firing patterns improve. Recommended exercises are based on literature that demonstrate high electromyography (EMG) activity of the rotator cuff and scapulothoracic musculature.28–32 It is important to remember that during AROM, proper rotator cuff activation is imperative to provide dynamic joint stability. When the rotator cuff is not functioning properly, there may be a significant increase in humeral migration and impingement with active upper extremity elevation.33 The following exercises are recommend for initiating AROM in the patient’s rehab program and then into the home program when appropriate.
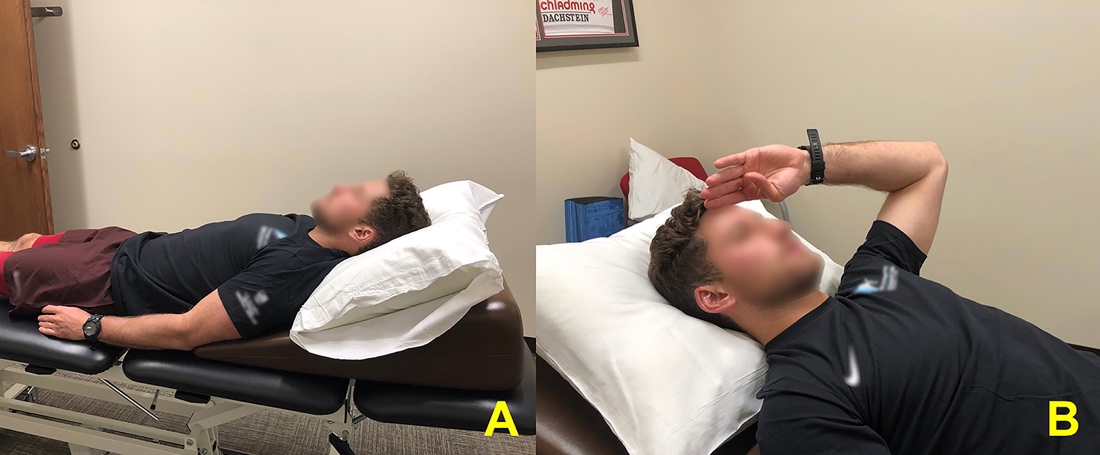
When initiating activation of the supraspinatus muscle, a gradual progression to the “full can” exercise is recommended. The patient can begin by performing the “salute” exercise (Figure 2) in the supine position, moving through forward flexion in the scapular plane with the elbow slightly bent to minimize the lever arm. This exercise can be increased in difficulty by performing the lawn chair progression, where the patient lies in a reclined position and progresses to a seated position as muscular endurance of the rotator cuff adapts to increasing gravitational demands. In the seated or standing position, the patient will progress to the “full can” exercise (arm in full extension), which has been shown to produce excellent supraspinatus activation.28
.jpeg)
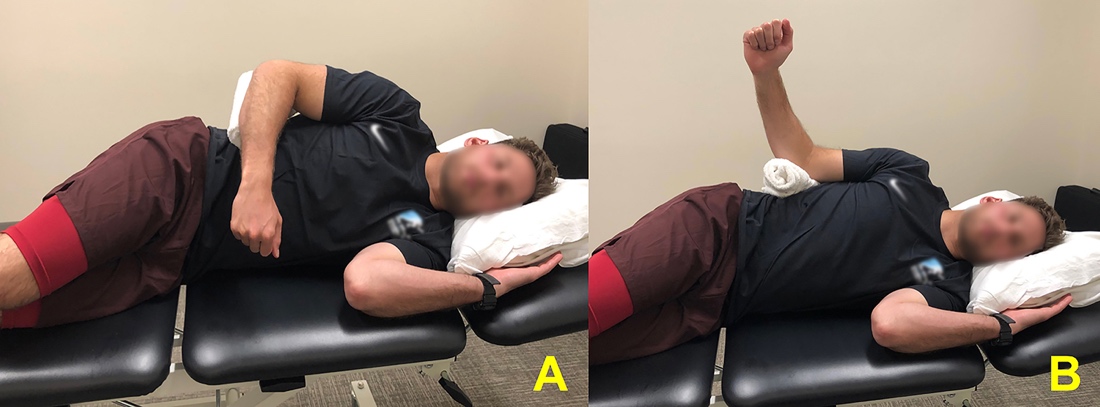
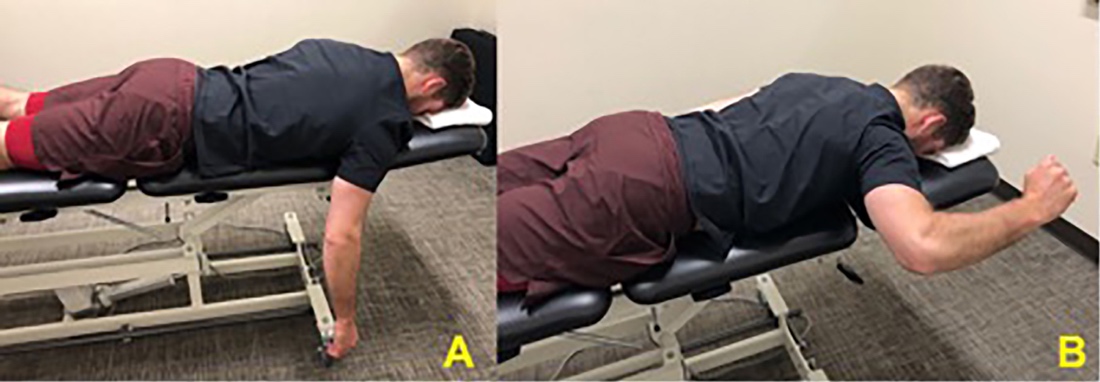
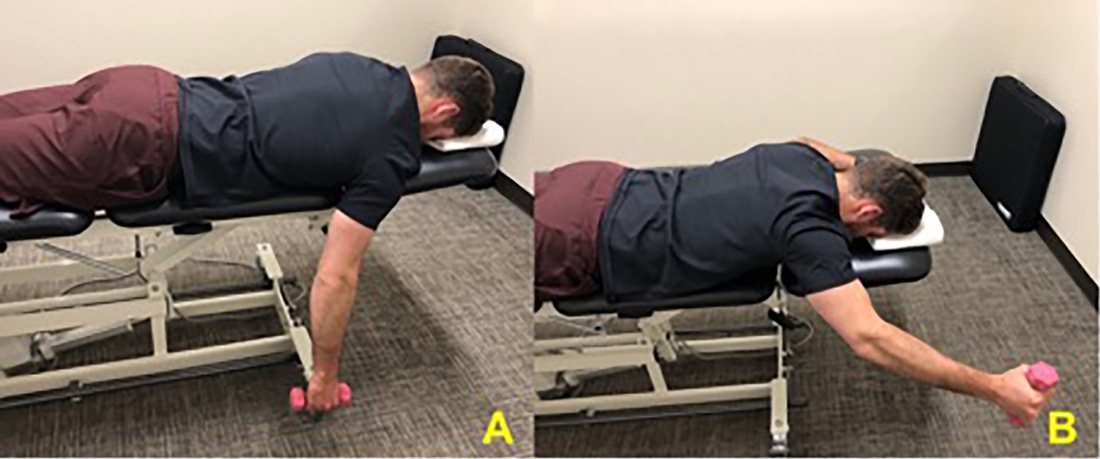
Activation of the infraspinatus muscle can be achieved by performing side lying external rotation (Figure 3). This exercise has been shown to demonstrate the highest EMG activation for the infraspinatus and teres minor compared to other exercises.29 Initial activation of the subscapularis can be achieved by performing standing internal rotation at 0° abduction and later progressing to 90°.30 When appropriate, the patient can progress to prone external rotation at 90° abduction, which has been shown to demonstrate high levels of subscapularis, supraspinatus, and infraspinatus activation (Figure 4).29,31
.jpeg)
.jpeg)
Endurance of the scapulothoracic musculature in concert with the rotator cuff is key to establishing proper scapulohumeral rhythm and stability with active motion.34 The prone row has been shown to demonstrate middle trap and rhomboid activity, while limiting a long lever arm.32 The prone full can has been shown to demonstrate high EMG levels of the supraspinatus, lower trapezius, and the posterior fibers of the deltoid.25,28,32 The serratus anterior (SA) is an important scapulothoracic muscle that contributes to posterior shoulder stability by maintaining scapular position on the thorax and preventing scapular winging.25,35 To initiate targeted activation of the serratus anterior, the patient can perform the exercise supine with the shoulder in 90° of flexion with scapular protraction, also known as “supine punch.”
Supine open kinetic chain (OKC) and proprioceptive neuromuscular facilitation (PNF) exercises can also be introduced at this time. Early in rehabilitation, PNF exercises play an important role in developing and facilitating muscular strength and endurance, joint stability, and neuromuscular control.36 Rhythmic stabilization exercises are a specific type of PNF that can be used to improve stability of the shoulder girdle. To promote posterior shoulder stability the patient can perform the “supine punch” as described earlier while the physical therapist provides external perturbations (Figure 5).32 The PNF exercises can be progressed further in later stages of rehabilitation.

Criteria to Progress
Prior to progressing to the initial resistance strengthening phase, AROM within indicated ranges must be restored with minimal pain and proper muscle firing patterns. Scapulohumeral mechanics and muscular endurance are evaluated during active motion by using scapular dyskinesis testing and Repeated AROM Fatigue Protocol noted in the criterion respectively.37,38 When the patient can perform these activities with a passing score, the patient possesses adequate joint motion, scapulohumeral mechanics, and muscle endurance to progress to the initial strengthening phase. The complete criterion to progress to Phase III of rehabilitation is outlined in Table 2.
Soft Tissue Considerations
During the course of rehabilitation, the patient will likely experience range of motion and soft tissue restrictions that may influence the stability of the glenohumeral joint. Due to the nature of the posterior instability repair, it is likely the patient will experience posterior capsular stiffness and shortening of the length of the anterior shoulder musculature. Manual techniques including stretching, soft tissue mobility and gentle joint mobilizations should be utilized to address impairments. Gentle posterior and inferior joint mobilizations can be utilized after six weeks to assist specifically in increasing internal rotation and abduction range of motion respectively.36 Selected low load prolonged stretches can typically begin at seven weeks post-operatively.
Phase III – Initial Resistance Strengthening
Initial resistance strengthening is introduced once criteria in Table 2 have been met and the patient is at least eight weeks post-operative. At this time the labrum is thought to be in the later stages of healing and can withstand preliminary loading of the tissue.26,39 The goal of this phase is to further progress rotator cuff and periscapular muscular strength and establish scapulohumeral control with increasing load to progress functional overhead activities.
Resistance based strengthening exercise begin by performing AROM exercises stated in Phase II and adding resistance bands or light free weights. Side lying external rotation, noted above for its high level of EMG activation of the infraspinatus and teres minor, can be progressed by adding free weights. The patient can also perform standing external rotation and internal rotation exercises using a resistance band or cable system. Similar to prone rows noted in Phase II, the patient may perform standing resistance band rows to promote middle trapezius and rhomboid strengthening. The patient can perform prone external rotation at 90° abduction with added weight to further enhance dynamic joint stability by strengthening the subscapularis, supraspinatus, and infraspinatus activation.31 The patient can also progress the prone “Full Can” exercise with added free weight to further strengthen the supraspinatus, lower trapezius, and posterior fibers of the deltoid (Figure 6).
.jpeg)
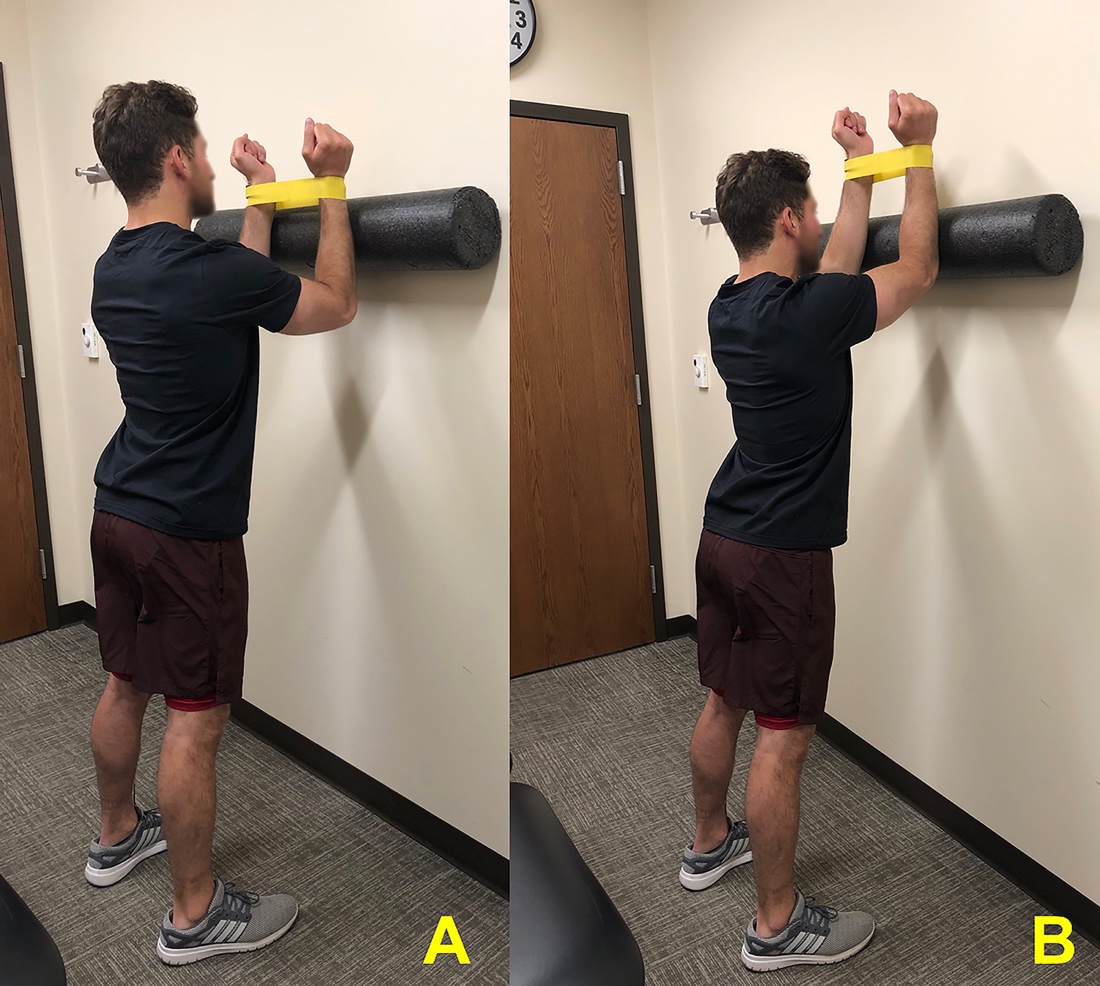
SA activity can be progressed by adding free weights to the “supine punch” described earlier. The standing wall slide with shoulder elevation above 90° is another exercise that promotes good SA EMG activity.35 This exercise can be progressed by adding a foam roller and band around the wrist to increase posterior rotator cuff activation (Figure 7). During all exercises, it is essential that the physical therapist monitors the patient’s movement patterns and cues the patient accordingly to ensure proper scapulohumeral mechanics and muscle activation patterns. Once this is achieved, progression to the next phase is considered.

Criteria to Progress
Prior to progressing to advanced strengthening, the patient should be pain free during all activities of daily living and be able to perform all strengthening in Phase III without issue. The patient should demonstrate nearly full pain free AROM prior to progressing. Strength symmetries are also evaluated through manual muscle testing or preferably by using a handheld dynamometer (HHD). It is recommended that the patient achieve shoulder strength of 4/5 or 80% of the uninvolved side as noted on the HHD. The complete criterion is noted in Table 3.
Phase IV – Advanced Strengthening and Power
Advanced Strengthening
Advanced strengthening is introduced once the criteria in Table 3 have been met, which typically occurs three months post-operatively. At this point, the posterior labrum and capsule are thought to be healed and able to withstand increased load demands.26,39 The goal of advanced strengthening is to continue progression of the rotator cuff and periscapular strengthening and further enhance dynamic shoulder stability while also emphasizing control with posterior loading to maximize advanced upper extremity function.
In order to enhance posterior rotator cuff stability, standing resisted external rotation can be performed, starting with the patient’s shoulder abducted to 45° and then progressing to 90°.28 Standing resisted internal rotation with the shoulder abducted to 90° has been shown to demonstrate high EMG levels of rotator cuff, posterior deltoid, middle and lower trapezius and can be utilized as well.30
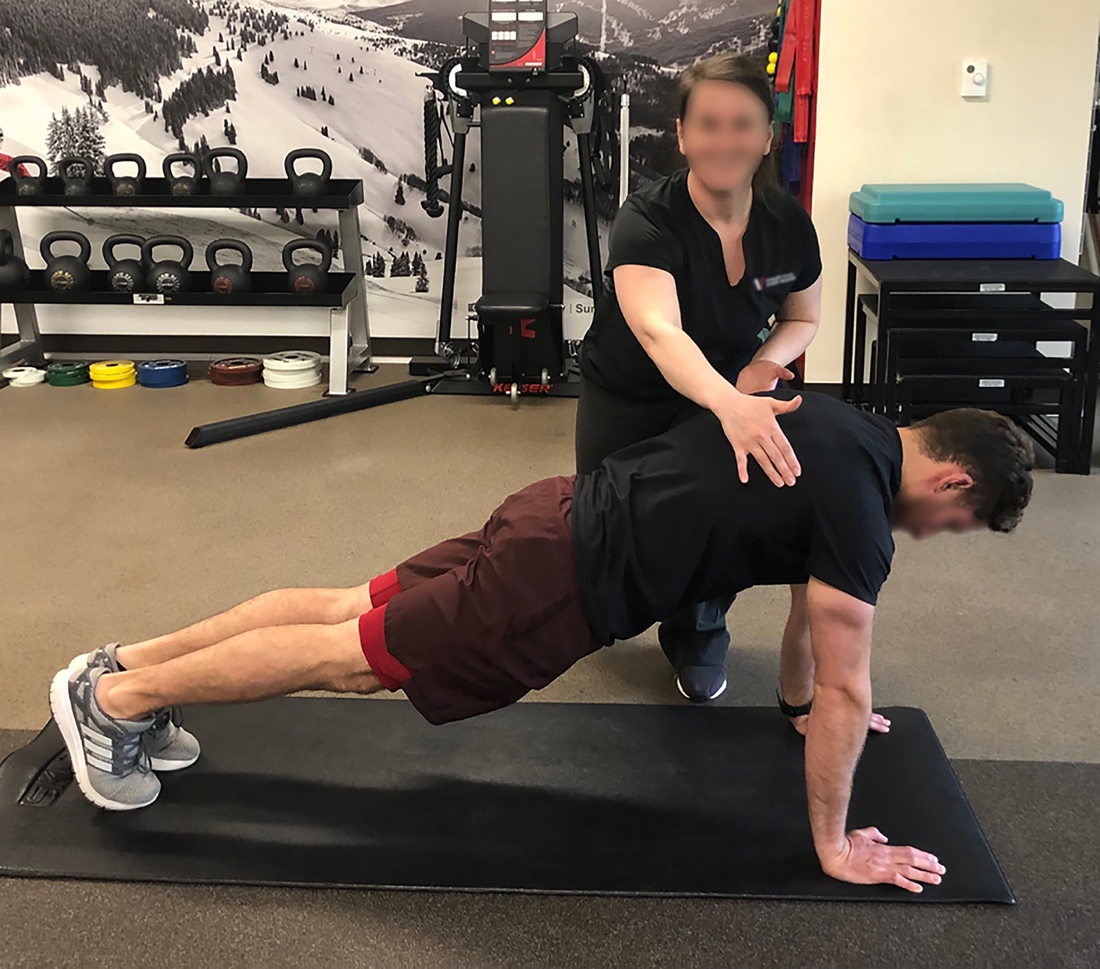
To further enhance posterior stability, closed kinetic chain exercises (CKC) can also be introduced. The “supine punch” discussed earlier can again be progressed by initiating a CKC position and performing a push up with scapular protraction. This exercises is commonly known as the “push up plus” and has been shown to demonstrate high EMG levels of SA activity.40 This is initiated by having the patient perform the exercise against a wall and progressing to the floor to increase loading demands.41 Increased difficulty with higher muscular demands can be achieved by adding unstable surfaces such as a BOSU ball. CKC exercises can also be advanced by utilizing rhythmic stabilization with external perturbations in positions such as a static hold of the “push up plus” (Figure 8). The patient can progress further by performing a plank with alternating shoulder taps. It is essential that the therapist monitors the patient’s mechanics to avoid excessive posterior translation of the humerus while promoting proper scapular placement on the rib cage to maximize stability.

Criteria to Progress
Once the patient can perform advanced exercises without difficulty and with proper scapulohumeral mechanics, progression to the power portion of Phase IV is considered. Shoulder strength symmetries are again assessed for improvement to a higher percentage, in addition to determining the patient’s strength ratio of external rotation/internal rotation with the use of the HHD. Various studies in the literature indicate that a normal functioning shoulder demonstrates strength ratios of 60-70%, promoting dynamic stability of the glenohumeral joint specifically with higher level activities such as weightlifting and throwing.42,43 The complete criterion to progress to the power portion of Phase IV is outlined in Table 4.
Power Exercises
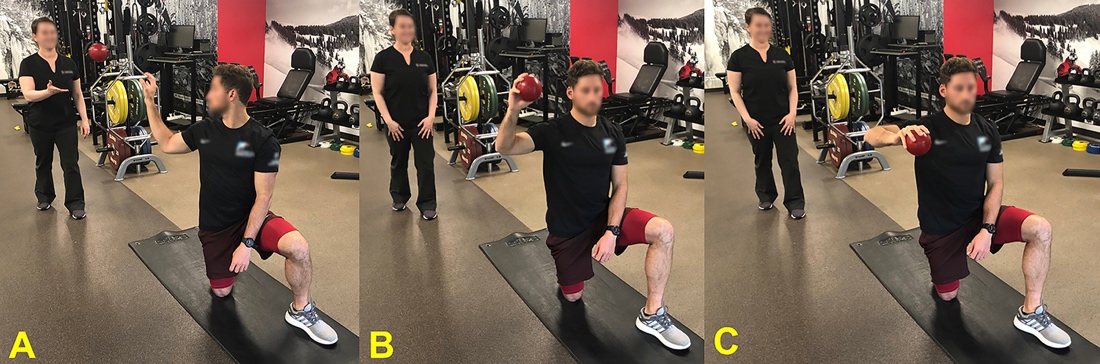
Once the patient has met the criteria listed in Table 4, they can begin power exercises, which typically occurs five months post-operatively. The goal of this portion of phase IV is to further enhance dynamic stability with advanced overhead activities, while introducing explosive muscular power with sport or occupational specific movement patterns. Plyometric exercises play an important role in the progression of rehabilitation and the development of power. It has been shown that plyometric exercises lead to increased shoulder power, endurance, enhancement of joint position sense and kinesthesia, and increased throwing power compared to isotonic exercises alone.47 Introduction to plyometric exercises can be accomplished by performing two-handed drills and progressing to one handed drills. For example, the patient can perform a two handed chest pass to a rebounder using a weighted medicine ball and then work towards higher levels of shoulder elevation, and then finally advancing to one handed pass.44 A plyometric exercise that emphasizes deceleration of the shoulder girdle musculature is the reverse throw. The therapist will throw a light weighted ball to the patient from behind. The patient will catch the ball while slowing down the ball’s velocity (Figure 9). Progression of the CKC exercises noted in previous phases can also be progressed to plyometric exercises. An example of this is the plyometric push up that can be performed initially on the wall and then progressed to the floor position.

Phase V - Return to Sport
Prior to return to sport specific training, the administration of a series of sport specific functional tests are recommended to determine the patient’s safety and readiness (Table 5).48–52 Once the patient is able to pass the functional testing pertinent to their sport, the surgeon and physical therapist should jointly decide if the patient is ready to return to sport specific training. Once cleared, sport specific training exercises such as a return to throwing program are initiated. This includes a gradual progression back into the specific demands of the sport using joint irritability as a guide. It is recommended that off days be used to continue a maintenance exercise program focusing on flexibility, cardiovascular endurance, upper extremity, and core strengthening.
Conclusion
The purpose of this clinical commentary is to provide an expert opinion and evidence-based rehabilitation protocol following posterior labral repair. Successful rehabilitation involves close communication between the surgical team, the physical therapist, and the patient throughout recovery. A customized protocol should be established based on surgical findings and specific patient needs. A criterion-based approach through the phases of rehabilitation are outlined to allow safe and individualized return to prior level of functioning. Phase I focuses on maximal protection of the surgical repair while regaining protected glenohumeral passive range of motion and initiation of gentle muscle engagement surrounding the shoulder. Phase II includes the introduction of AROM and progression of proper firing patterns of the rotator cuff and scapulothoracic musculature. Phase III consists of resisted strengthening exercises using bands and free weights to enhance dynamic glenohumeral joint stability. Phase IV progresses strengthening and power of the shoulder girdle utilizing advanced CKC and plyometric exercises while highlighting dynamic control with posterior loading of the shoulder. Phase V focuses on returning the patient back to his or her specific sport. Restoring and maximizing dynamic joint stability is essential to optimal recovery and is the focus of the rehabilitation program. The main goal of this rehabilitation process is to allow the patient to return to his or her prior level of unrestricted activity.
Conflicts of interest
Dr. Lacheta’s position at the Steadman Philippon Research Institute was supported by Arthrex.
Dr. Provencher reports grants, personal fees and other from Arthrex, from Smith & Nephew, from Siemens, from Össur, from Joint Restoration Foundation, from SLACK Incorporated, outside the submitted work.
Dr. Millett reports grants, personal fees and other from Arthrex, from Smith & Nephew, from Siemens, from Össur, from Medibridge, from Springer Publishing, from VuMedi, outside the submitted work.